Articles Archives
Click on each to read the article.
Downsizing in Style
Fall 2013
Articles Archive
Downsizing in Style
11/25/13
Fall 2013
Downsizing in Style
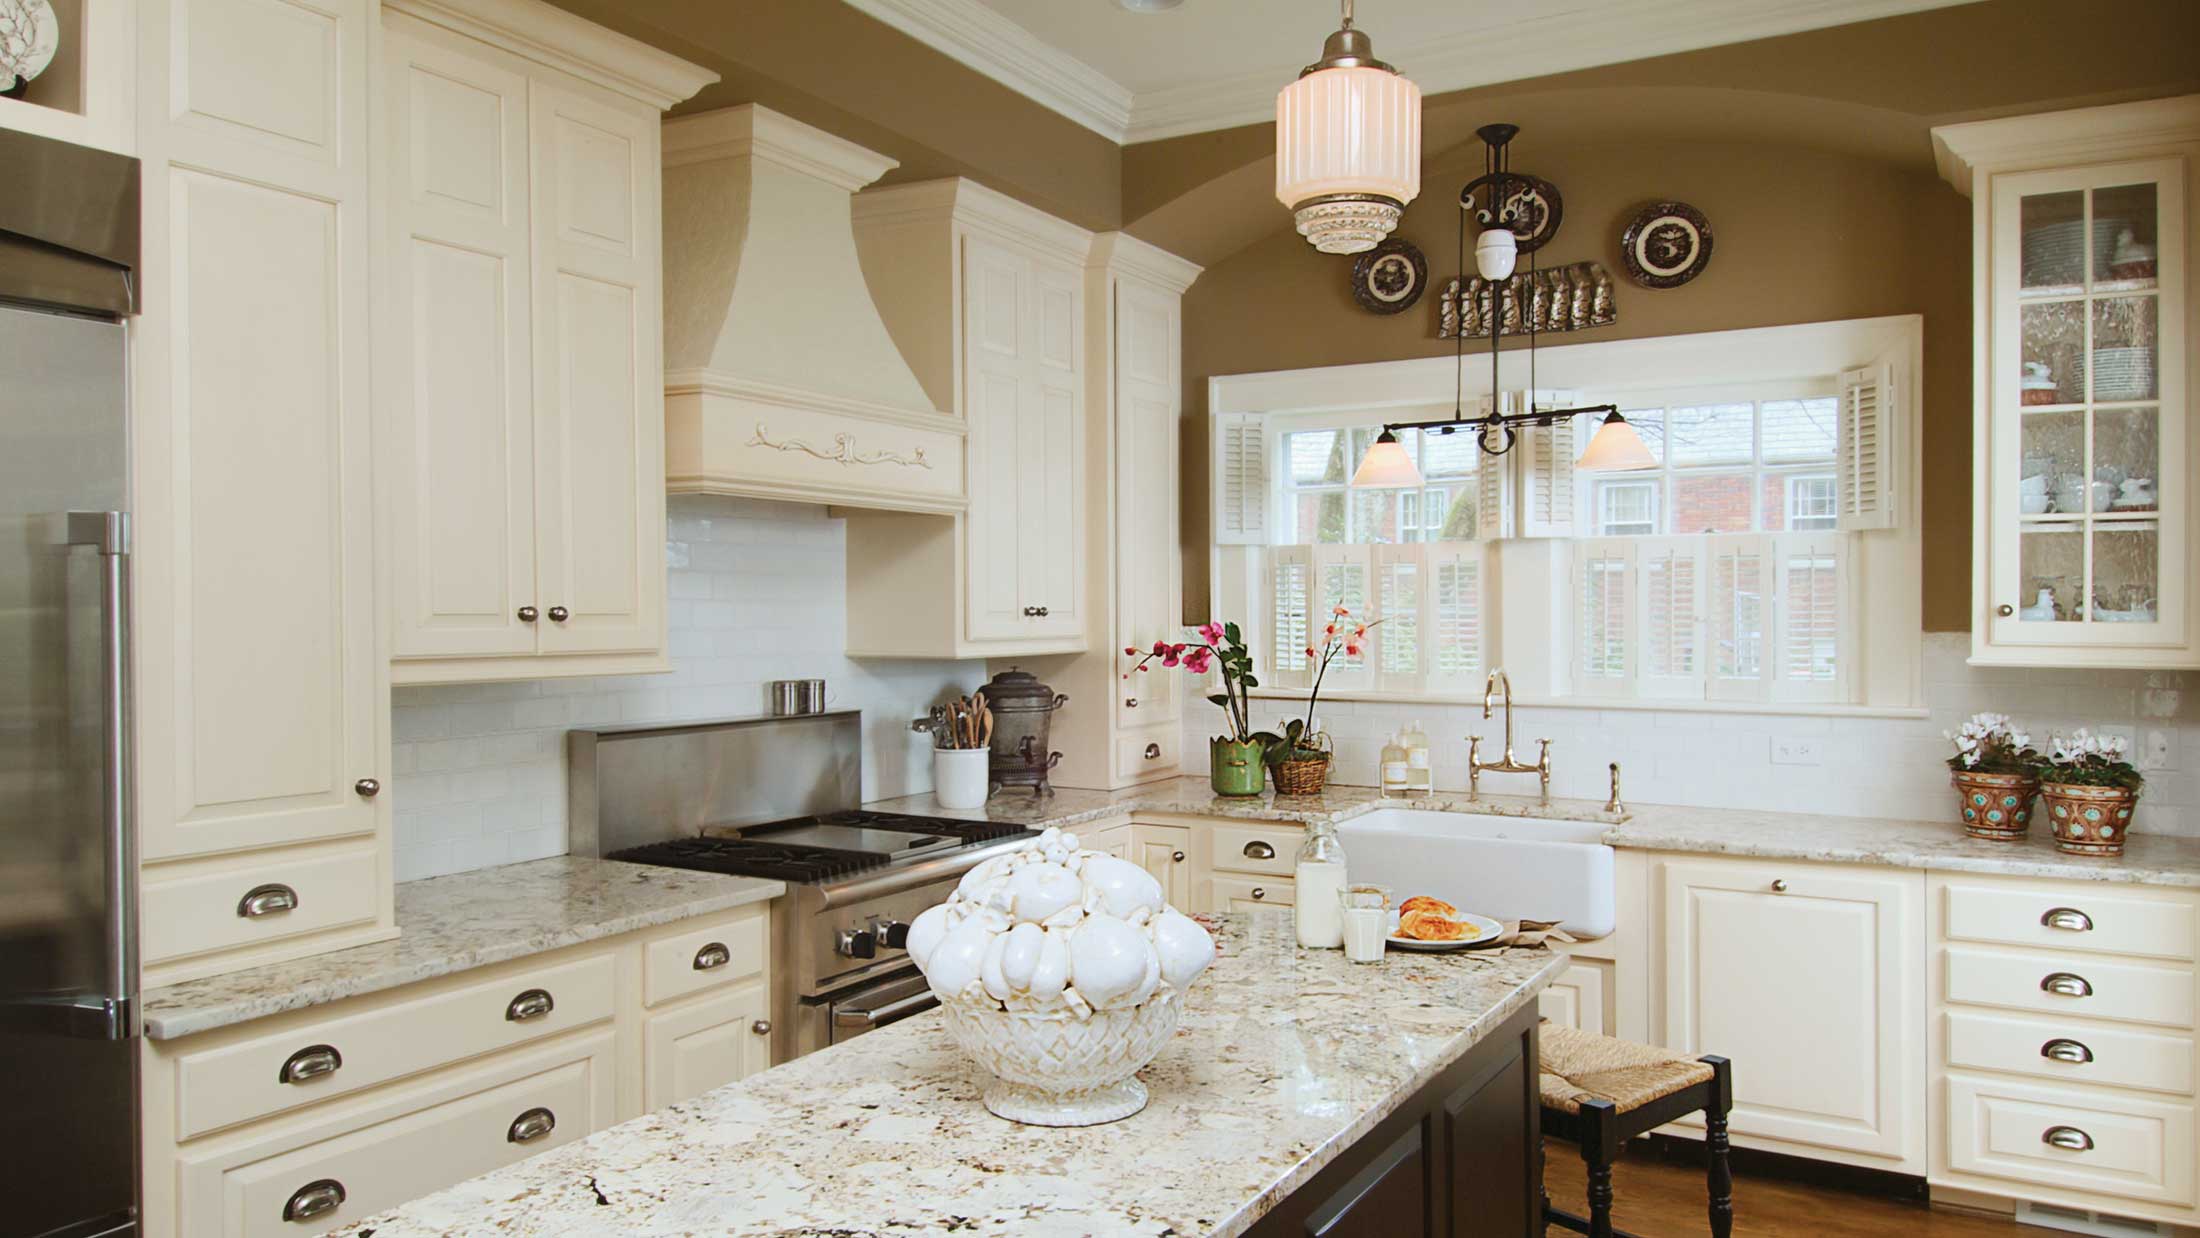
Boomers get the kitchen they love
Story and Photography by Gina Arledge
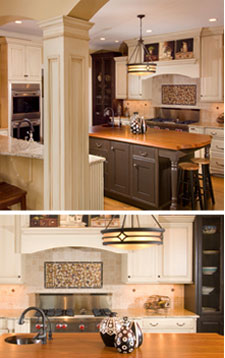
To improve upon the space in one Greensboro couple’s kitchen, designer Gina Arledge added an extra large island that features a creative way to store dishes, shallow base cabinets and an extra sink.
Many Baby Boomer clients of mine are embracing life more than ever, and most of them are choosing to simplify their lives by making changes in their homes. Gone are the days of maintaining huge yards and huge houses. For many, downsizing in style is a fast-growing trend that offers the amenities of larger homes without the square footage and yard to maintain.
Special thought goes into the planning of these homes. Hobbies and interests are given great emphasis, for example, as many clients are heading toward a lifestyle with less stress and more enjoyment of things that are important to them. Retirement or reduction in work hours is common, so time to enjoy the space where these boomers reside is more abundant as well.
Although these houses might not hold a family of four or five, it’s important that they can accommodate larger crowds of visiting relatives. Spare bedrooms, then, often function on a daily basis as hobby rooms, sewing rooms or libraries, but they can easily be shifted to a guest room by the creative use of day beds or pullout sofas. Larger, more open gathering areas give these rooms a more spacious feel as well while making families feel welcomed and comfortable.
Creating new spaces
Recently, I worked with a lovely couple who wanted all of the above. They had raised their children in a Greensboro suburb, and as empty nesters they were ready to be closer to these wonderful amenities. They also were ready to build the home they would spend the rest of their lives enjoying.
The kitchen was a particular pleasure to design. Openness and light were important to these folks. There was an extra large window that brought in sunlight, but it didn’t leave a lot of room for wall cabinets. Instead, an extra large island was designed with dish storage and shallow base cabinets on each side. With prep space available on three sides of the island, an extra sink was implemented to accommodate the kitchen’s two cooks. The island also was also raised three inches taller than the standard height to provide a more comfortable working height for the tall couple.
A large wall cabinet with a drawer now rests on the countertop and holds small appliances and larger serving dishes. At 18 inches deep, its capacity was increased by 50 percent over the standard size while also being more easily accessed.
Clever corner storage and pot-and-pan drawers near the range left room for a trash and recycling pullout area near the sink. A drawer dedicated to spice storage now keeps them at their fingertips, and tray dividers installed over the refrigerator now allow for easy access as well. An apron-front copper sink from Thompson Traders, meanwhile, adds extra charm and perfectly complements the weathered-style rustic alder cabinetry.
There now are a total of four wall cabinets in this couple’s kitchen. It doesn’t sound like a lot, but creative planning and homeowners who knew just what they wanted created a kitchen that perfectly suits their needs without getting too fussy. The kitchen now opens to the couple’s dining and great rooms, giving a perfect view of family gatherings while functioning independently as its own space.
Life now is simpler for them—simply wonderful.
Gina Arledge is owner of The Kitchen Studio Inc. in Greensboro. To learn more, call (336) 855-0903 or visit thekitchenstudioinc.com.

Tearing Down Walls
Summer 2013
Articles Archive
Tearing Down Walls
08/06/13
Summer 2013
Tearing Down Walls
An early 20th century kitchen’s transformation
By Gina Arledge
This 1950s home in Greensboro’s Kirkwood neighborhood included a recent complete kitchen transformation that doubled its size and updated its technologies.
Photo:Gina Arledge
Greensboro’s Kirkwood neighborhood is known for its traditional 1950s ranches and quaint bungalow-style homes. The tight-knit community is host to the Kirkwood 5K, the infamous Kirkstock block party and multitude of activities at Easter, Halloween, and Christmas each year.
The neighborhood was established in 1923 but didn’t fully begin to develop until after World War II. Built to provide homes to soldiers returning from the war, the houses were of modest size. Many homes today have been remodeled to accommodate growing families by adding bathrooms and larger closets, but the most popular renovation is the kitchen.
A refreshing update
On Colonial Drive sits a charming, unassuming home. From the outside, it scales nicely to the next door neighbors’ homes. However, looks can be deceiving. Inside is a spacious living and dining room, and—as of late last year—a beautifully remodeled kitchen.
The largest criticism the clients of this home had was the size and functionality of their kitchen space. The room shared a wall with their family room as well, which had to be accessed through the dining room and down a hallway. The family room was one of the their most-used rooms, and having diverted access from the kitchen made it feel less like an integral part of the home. The shared wall also was beneath a staircase, which simultaneously created a nook for the refrigerator and a bottleneck feeling when the refrigerator was open. The kitchen felt small and crowded.
The homeowners wanted the shared wall beneath the stairs removed so the family room was both visible and accessible from the kitchen. They were willing to give up an access door to the back deck so the refrigerator would have its own space.
These changes allowed an amazing transformation to occur. The newly designed kitchen feels twice the size of its former self. It is bright and airy and highly functional. The opening beneath the stairs became a peninsula of storage, workspace and seating for two.
Utilizing the space available, a niche for charging stations and a message center were created. The refrigerator now is tucked away nicely where it is accessible without being in the way, and the cabinetry was designed for maximum storage and a breathtaking style. The hardwood floors were refinished, and the granite now is a refreshing light-colored stone. A classic white subway tile pulls everything together and is in keeping with the period of the home. It’s a stunning, modern-day kitchen with classic, mid-century roots.
Gina Arledge is owner of The Kitchen Studio Inc. in Greensboro. Learn more about her recent projects and her company’s services by calling (336) 855-0903 or by visiting thekitchenstudioinc.com.

Repurposed Space
Fall 2012
Articles Archive
Repurposed Space
11/27/12
Fall 2012
Repurposed Space
Kitchen project completely transforms the room
by Gina Arledge
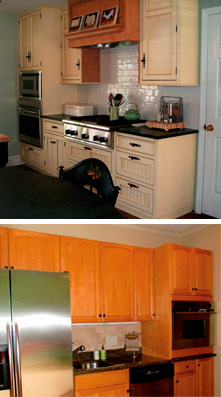
In the early 1990s, white thermo-foil cabinetry was a hot selection for builders to put into spec homes. It was a less expensive alternative to painted-wood cabinetry, and it touted a maintenance-free finish.
Flash forward 20 years, and some of this once-popular cabinetry hasn’t held up quite like clients had anticipated. De-lamination and yellowing has caused thermo-foil cabinetry to significantly age their kitchens—and it’s putting a dull finish on their homes too.
Close friends of mine had one of these kitchens. Drawer fronts literally were peeling off. The couple never was truly happy with the layout of the kitchen either, which made it a perfect opportunity to replace the cabinetry and transform the space.
At the same time this project started to take form, I was replacing a gorgeous display from my showroom. It was a beautifully painted and glazed finish with a grand hood, spice pullouts, a two-bin pullout trash bin, and plenty of storage. I recommended trying to work out a redesign of the display into their space, coupling it with a darker-stained alder finish for the remainder of the couple’s large kitchen.
Starting from scratch
The family has two busy teenage sons and two active Labrador Retrievers. There is an amazing pool out back, and they entertain a lot. In fact, it is not unusual for there to be six or seven teenagers hanging out there on any given day. My friends enjoy cooking and wanted the kitchen to be a comfortable space in which to hang out.
However, the kitchen’s original design had the cooktop in an undersized island and the refrigerator on the back wall. There was a desk that ultimately ended up being a catch-all for junk—and a rarely used space. In front of the desk, there was a cavernous space with no purpose.
There simply was no focal point in the kitchen. Cabinetry just lined the walls. Bins of dog food were stacked on the floor near the refrigerator, and the trash can was always on the floor under what then was the end of the island. Glass doors over the desk served no purpose either.
The beautiful hood from the display I had created in my showroom inspired me to make it into the centerpiece of this couple’s kitchen. I moved the refrigerator off of the back wall, and it transformed the space. Replacing the cooktop with a free-standing range gave the family a second oven, while the pullout spice racks from my display were installed on the range’s left and right. A tumbled marble backsplash now ties the granite and cabinetry together beautifully.
A shallow pantry next to the oven and microwave cabinet now houses dog food and gets it off the floor. The refrigerator is built in between panels, allowing the storage cabinet above it to be accessed easily. Tray divider inserts over the microwave allow for vertical storage of cookie sheets and platters.
The desk was converted into a wet bar with a sink and an under-the-counter beverage center. Above the bar now are beautiful open cabinets with cottage wire that holds the couple’s entire bar wares.
On the window wall, a large extended-depth wall cabinet rests on the counter and holds everyday dishes. Cottage wire doors on that piece carry over from the wet bar and add charm and personality to the space.
The island utilized three cabinets from the display, including the pullout trash and recycle bins. The floor now is free from an exposed trash can, and everything is tucked neatly out of sight. Shallow storage on the back side of the island and seating at the end complete the room’s look and functionality. The island size increased as well, pulling the seating into the cavernous space in front of the previous desk area and making the kitchen feel so much cozier.
The hungry band of teenagers who frequent this couple’s home now have made the kitchen their second home. The pups are very proud of their granite doggy bowl stand, and their food is out of sight but never out of mind. The homeowners have found themselves hosts to several parties and quiet get-togethers with friends. It’s a space that’s special to me because it reflects the trust my friends had in my craft while also reflecting the love their family has for being together.
Gina Arledge is owner of The Kitchen Studio Inc. in Greensboro. To learn more about her business, call (336) 885-0903 or visit www.thekitchenstudioinc.com.

Seeking Inspiration
Summer 2012
Articles Archive
Seeking Inspiration
08/22/12
Summer 2012
Seeking Inspiration
Unused mud room transforms into custom, functional pantry
by Gina Arledge
Before building my home 14 years ago, I chose a house plan that was very close to perfect for my growing family. The original kitchen plan was a bit on the smaller side, however, so I elected to move the laundry room—which was beside the kitchen—upstairs.
I didn’t need the full six feet of width added to my kitchen, so I used half of the space for the kitchen and then designed the remaining three feet into a mud room. I envisioned that as you entered the house from the garage, this room would serve as the landing space for all of our coats, shoes, bags and umbrellas. It even would hold our brooms and mops.
I thought that I was so brilliant for creating such an amazing space. Well, the joke was on me. As it turned out, a three-foot-wide room was not a place that my family would utilize. They preferred, instead, to drop everything at the entrance to the mud room. Ignored were the clever labels located near each hook, designating each child’s book bag. Forgotten were the shelves designed for their shoes; it was way more fun to kick them off as they walked into the house.
This room became an embarrassment for me. It was the first thing people saw when they came into my home. I was constantly kicking all of the junk past the door and then praying that I could still close it. And I was always complaining about the mess. My children would tell you that it was my favorite punishment: “Go clean the mud room.” “Nooooooooo!” they would scream, begging for mercy. Something had to change, and after 14 years it finally—mercifully—did.
A welcome change
I had decided to upgrade my pantry from the standard builder-issue wire shelves to wooden ones when the thought occurred to me that perhaps I should consider switching my pantry to the mud room. My logic was that I would assign a purpose for every square inch of that glorified hallway. Would it work? I had been wrong about this space before, so I admit that I was hesitant. I searched for inspiration, but there were no three-foot-wide rooms on Pinterest offering me any direction.
As a kitchen designer, I seek inspiration from my clients. Each client is unique, and that has served me well in creating unique spaces. I asked myself some of the same questions that I often ask them when working on their projects and came up with this short list:
- I love to cook
- I needed storage for cast-iron pans, Dutch ovens and food
- I wanted my KitchenAid mixer to have a purposeful place to reside
- I needed a place for my Keurig coffeemaker
- I wanted it to be a place that I could be proud of
Designing the space
Sketches were drawn. I designed a cabinet with a countertop at the back end, leaving enough clearance for shallow shelving and space for a small trash can. An electrical outlet was to be installed above the shelves for my appliances. Various-depth shelving from floor to ceiling would allow for storage of differently sized food items and baskets. I was happy with everything, except for the blank wall on the left.
Oh, and also that pesky inspiration concept. Due to width constraints, I thought I that I might be limited to some interesting artwork. I searched for inspiration in the places I love, like Paris. Although I have never visited the City of Light, its Eiffel Tower often makes it into my dreams. From Paris, my mind skipped to food, which reminded me of “Le Cordon Bleu,” which then reminded me of Julia Child. Reflecting on a tour of her kitchen at the Smithsonian Institute, I remembered the wall of pots and pans that her husband lovingly built for her. And there it was: my inspiration.
And while I certainly am no Julia Child, I love her and I love Paris, and that was enough inspiration for me to complete my blank wall—and my glorious new pantry space. I am proud to say that I happily keep the door open these days.
Gina Arledge is owner of The Kitchen Studio Inc. in Greensboro. To learn more about her business, call (336) 855-0903 or visit www.thekitchenstudioinc.com.

The New Galley
Spring 2012
Articles Archive
The New Galley
03/30/12
Spring 2012
The New Galley
A kitchen transformation worth emulating
by Gina Arledge
I recently had the privilege of redesigning a kitchen area from a cramped dark space into a spacious, dazzling cooking and entertainment room.
Four walls with a small entrance, one window and a small pass-through area made up the original space of the kitchen. In an attempt to update it, new appliances had been purchased, but they were a shiny contrast to the old and tired cabinetry. The window was small and allowed very little light to enter, while the pass-through led into a small sunroom.
The homeowner was desperate to have a cheerful kitchen, one that was open to the rest of her house and that would be conducive to entertaining large groups of friends and family. Cooking in a beautiful yet functional space was a top priority for her. It served as an inspiration to us both when redesigning and redefining her new kitchen.
Setting a game plan
Before our first meeting, the client had worked with an architect on plans to add a large family room adjacent to the kitchen. This area provided the perfect segue into the open feel and flow that she was hoping to achieve.
During our initial appointment, we discussed how each room functioned for her. The kitchen was too small and closed off, and there was not enough pantry storage space. The sunroom entrance from the den was blocked by a sofa because there was not enough wall space in the den for furniture.
The client was willing to give up the space if it could be incorporated into the kitchen in a way that made sense. However, she was concerned because a fireplace also protruded out into the room, making the den an even narrower space.
Creating functional space
I love a challenge. And with this project, boy did I get one. Fortunately, the builder was replacing the entire exterior of the back of the home, which provided me with flexibility on the location of two windows that I wanted to incorporate. I was able to design a functional, modified galley-style kitchen. The style suited the home and offered easy access to everything the homeowner needed while cooking.
A broom closet was added to the far end of the fireplace, while a shallow pantry cabinet, open display shelf and base wine cubbies were tucked into the narrow end of the kitchen. Both the down-draft range and kitchen sink were designed beneath the new, larger windows. In lieu of a typical built-in or countertop microwave, a microwave drawer was installed. This is a clever way to gain more countertop space and wall cabinet storage.
A Lazy Susan with wooden shelves turned the corner into a peninsula equipped with a large drawer base. An extension of the countertops on the back side of the peninsula created seating for three bar stools, as well as an open divide between the kitchen and new family room. The refrigerator was tucked neatly beside the fireplace located just across from the sink but still easily accessible from the range.
My favorite element in this kitchen was the incorporation of the existing brick from the back of the fireplace. Shallow wall and base cabinets were devised to store spices and small appliances, and in between that an area of exposed brick now adds charm to the kitchen, as well as a sense of nostalgia.
According to the homeowner, her remodeled kitchen is seeing a lot of traffic these days. Dinner parties, family gatherings and even quiet evenings at home are taking on new meaning in this beautiful new area.
Gina Arledge is owner of The Kitchen Studio Inc. in Greensboro. To learn more, call (336) 855-0903 or visit www.thekitchenstudioinc.com.

Kitchen Considerations
Winter 2012
Articles Archive
Kitchen Considerations
02/22/12
Winter 2012
Kitchen Considerations
Ensure your cabinetry and countertops fit with the times.
by Gina Arledge
My colleague, Jane, and I recently were invited to dinner at a former client’s home. We had installed her kitchen seven years ago, but upon entering we were immediately struck by the timeless nature of the room. When we walked in, it looked like it belonged on the cover of one of today’s home interiors magazines. Her beautiful painted cabinets and light granite countertops were a perfect complement to her handsome Irving Park home.
I don’t bring this up to toot my own horn. The homeowner is a well-known interior designer who was instrumental in the design of her kitchen. I raise the subject to simply highlight the importance of designing a kitchen that complements one’s home while also retaining a level of timelessness that will carry that investment through years and years of style changes.
It’s easy to get caught up in the latest design crazes. Our mailboxes are filled with catalogs encouraging us to change our interiors to keep up with the latest trends. I’m a big fan of adding things to my home’s interior that will provide a spark of newness; I just don’t think it’s wise or affordable to redecorate as fast as the trends change.
Four kitchen design tips
Kitchen cabinetry is the equivalent of furniture in other rooms. It is important, and it is not inexpensive. Keeping a few things in mind before embarking upon a kitchen remodel can buy you years and years of timeless enjoyment.
First and foremost, make certain the style of your kitchen is a direct reflection of your home and your personal taste. You most likely purchased your home because you liked it. Complementing that style with proper cabinetry is an important consideration.
Mistakes I’ve seen would involve, for instance, cherry Shaker cabinets installed in a classic Georgian home or ornate, heavily distressed cabinets installed in a 1930s bungalow. The cabinets and styles certainly have their place, but they don’t quite fit the style of the above-mentioned homes.
Secondly, it’s important to consider your cabinetry and countertops as more permanent fixtures. Their styles and finishes will need to carry you through years of wear and tear, but also years and years of style changes. Wall colors, tile backsplashes, and even dishes and accessories are all items that can be more easily changed and cost significantly less to do so. Select a cabinet finish and door style you know you can live with for a very long time, and be less concerned about picking a wall color you will love forever. Changing paint color can make a significant style distinction without costing a fortune.
Third, take advantage of what is unique about your space. In the kitchen pictured, the back of the fireplace protruding into the room was cleverly disguised as a pantry cabinetry. The shallow space left over was used to make a message board. Sometimes awkward areas can be remade into functional, beautiful spaces.
Lastly, remember that your kitchen should be as unique as you are. No one functions in his or her kitchen exactly the way you do. It’s important to incorporate features into your kitchen that are a direct reflection of how you operate in the space. Having the latest and greatest gadget installed in your kitchen is only a good thing if you use it. Form follows function. Remember that.
Gina Arledge is owner of The Kitchen Studio Inc. in Greensboro. To learn more about the business, call (336) 885-0903 or visit thekitchenstudioinc.com.

From Fiberglass to Fabulous
Fall 2011
Articles Archive
From Fiberglass to Fabulous
11/22/11
Fall 2011
From Fiberglass to Fabulous
Boys’ bathroom goes from outdated to chic
by Gina Arledge
A good friend of mine recently asked me to update her children’s bathroom. Three things in particular were pushing her in this direction.
First, the home was built 13 years ago. She and her husband were in their late 20s with a young family when they moved in, and they put the things they could afford into the home. In their boys’ bathroom, they opted for a fiberglass tub-shower insert because it was affordable and easy to keep clean. It served them well when the kids were young, but as the boys grew they stopped taking baths and migrated into their parents’ walk-in tile shower in the master bathroom. A family of four quickly found themselves sharing one bathroom.
Second, the bathroom was decorated in pure nursery fashion. Soft pastel wallpaper and childish art adorned the walls. The middle school-aged boys began to avoid the bathroom like the plague and were embarrassed when their friends commented on its juvenile style.
Third, the bathroom was located at the top of the staircase and was the first thing guests saw upon entering the second floor. The rest of the home had lovely warm tones, so the pastel colors of the bath were quite a shock.
Up to the task
I set out to design not only a beautiful bathroom, but also one that would lure the boys back into it and out of their parents’ personal space. I had to make it both functionally appealing and an integral part of the rest of the house. It was important to make the boys feel more comfortable in a more age-appropriate surrounding.
The wallpaper was the first thing to go. A richly colored paint was selected to replace it, which instantly made the room feel more grown up. Next was the fiberglass tub-shower insert, which was replaced with a full shower and floor-to-ceiling tile. A semi-frameless sliding glass door completed the look while making the bathroom feel much more spacious. It also allowed for a spectacular view of the new tile and shower fixtures.
The original vanity cabinet, toilet and tile floor all remained. A granite remnant and new undermount sink replaced the old cultured marble countertop, but the existing faucet was reused. New black knobs replaced the old, painted wooden hardware and instantly transformed the vanity from childish to hip.
Black accents gave the bathroom a more masculine feel while also incorporating a bit of the boys’ tastes. Open shelves hanging above the toilet now leave room for photos, knick knacks and extra toiletries.
The transformation was a success. The boys now proudly share their own bathroom, and their parents have regained possession of their own bathroom. Now the top of the stairs no longer has an eyesore, but a lovely and functional new view.
Gina Arledge is owner of The Kitchen Studio Inc. in Greensboro. To learn more, call (336) 855-0903 or visit www.thekitchenstudioinc.com.

Central Perk
Summer 2011
Articles Archive
Central Perk
08/23/11
Summer 2011
Central Perk
Creating unique coffee spaces
by Gina Arledge
I travel with my coffeepot. As an admitted snob of all things java, I find that it’s crucial to take along my best morning friend to avoid potentially going several days without a good brew.
Don’t get me wrong—I don’t take it to my in-laws’ or my mother’s house. When they know I’m coming, they amp up the strength because they know me. But extended stays at a condominium, hotel, or vacation home scare me. What if they don’t have a coffee grinder?
My friends used to joke that I made things complicated by lugging my coffeemaker, which holds a half-pound of whole beans in its top. That is until a group of us traveled to Cooperstown, N.Y., for an entire week to watch our children play baseball. Our families stayed together at a large bed and breakfast on a beautiful lake. It wasn’t until our first morning there when we realized that the place didn’t actually serve breakfast—or coffee. I quickly became everyone’s new best friend. Everyone was properly caffeinated, including guests who weren’t in our group. No one makes fun of me anymore.
But I digress. Equally important to me as a kitchen designer is the location of the all-important coffeemaker. My ears perk up when I meet with a client who shares my passion for coffee. While most clients wind up with coffeemakers next to their sinks, occasionally I get to design a spectacular space just for java.
The coffee challenge
A few years ago, a client expressed a desire for storage of an espresso machine. She was unsure whether there’d be adequate counter space to devote to the appliance because access to the top was crucial.
This family’s morning ritual revolved around a great cup of coffee for mom and dad and hot chocolate for the kids. I was challenged to incorporate this important tradition into their new kitchen—and became inspired by her passion for it.
A nook where a refrigerator once stood served as the perfect spot, and a small sink was incorporated into the design as well. An extra-deep drawer below now holds coffee mugs, while the area behind the coffee bar became the ideal canvas to hang a magnificent piece of art commissioned by Steve Lynam, the Tin Man. It all came together beautifully.
Recently, I had the honor of creating an entire room devoted to coffee. This particular client shared my deep appreciation for the perfect cup of java and invested in a Miele Coffee System. This unit is not for the faint of heart. It is a device that is plumbed for its own water supply. It will make lattes, espressos, cappuccinos and macchiatos. It will froth milk and store whole beans. It will make you an instant barista. It is a built-in appliance, so it opens up valuable counter space.
In this case, I designed another deep drawer for mugs and incorporated an under-the-counter refrigerator as well. Glass doors and beautiful tile completed the look.
For me, paying homage to this wonderful drink while designing a kitchen simply is an added bonus to the work I do.
Gina Arledge is owner of The Kitchen Studio Inc. in Greensboro. To learn more, call (336) 855-0903 or visit www.thekitchenstudioinc.com.

Maximize Form and Function
Spring 2011
Articles Archive
Maximize Form and Function
05/24/11
Spring 2011
Maximize Form and Function
Making the best of a smaller kitchen
by Gina Arledge
When most people describe their dream kitchen, they begin with terms like large, expansive and grand. A large kitchen certainly has its advantages, but working within the confines of a smaller space can lead to a highly functional room with charm, high style, and a price tag more palatable than its larger counterpart.
While designing a smaller kitchen presents unique challenges, the benefits of reinventing this vital space are numerous. When making the decision to remodel a smaller kitchen, here are a few tips to consider:
Take advantage of all useable space. This can mean taking cabinets all the way up to the ceiling to maximize storage space. This additional space might be a bit of a challenge to reach, but it serves as a great place for necessary items that aren’t used often. A pull-out stool is a handy remedy for these hard-to-reach spots. Also consider placing cabinetry or work surfaces in spaces that ordinarily are considered off limits, such as below a large window that rests below standard cabinet height. Often, it’s quite functional to have a lowered prep counter in the kitchen. If space allows, it also provides excellent additional storage.
Think shallow cabinetry for functional storage. Consider reduced-depth cabinetry in areas where clearance is tight. When storing items in a cabinet that’s only 12 to 15 inches deep, items like handheld appliances and pantry goods are accessible without much rearranging.
Consider the size and configuration of appliances. A small kitchen might not be the best place to utilize a double-oven cabinet or custom wooden hood. Instead, it might be better to incorporate a range with a microwave hood above instead. And while a counter-depth refrigerator can help open up a kitchen, it’s not always a necessity in a smaller space.
Create perceived space using glass. Not only do decorative glass doors provide remarkable charm, but they also give a kitchen the perception that it’s larger than it truly is. Adding interior lights and glass shelving further enhances the effect while highlighting the items inside. Everyday dishes, glasses and stemware look lovely while adding a touch of personality.
Adjacent rooms make great storage. If a laundry room, mud room or large closet is located near the kitchen, then consider incorporating additional storage there. Shallow pantry cabinets and wall-hung pot racks are excellent ways to increase kitchen storage using nearby rooms.
You don’t have to compromise function or style when working within the limits of a small kitchen. Careful planning and a creative approach can open the doors to a small but amazing space.
Gina Arledge is owner of The Kitchen Studio Inc. in Greensboro. To learn more, call (336) 855-0903 or visit www.thekitchenstudioinc.com.

A Happy Marriage
Winter 2011
Articles Archive
A Happy Marriage
03/04/11
Winter 2011
A Happy Marriage
Greensboro couple’s similar styles help transform kitchen area
by Gina Arledge
Nestled on a quiet street just off of Holden Road in Greensboro is a comfortable, unassuming, ranch-style home. Behind its doors is an amazing kitchen transformation that turned a small, outdated breakfast and kitchen area into a high-style, high-function workspace that also happens to be easy on the eyes.
When I first met with Mark and Lynn Wagoner, I was drawn to their eclectic style, their artistic use of color, and their open-mindedness to change what they had in their existing kitchen. The couple’s overall goal was to have an open flow between the dining room and kitchen.
In the existing plan, a full bath was located in the hallway connecting the two rooms. But the hallway created a bottleneck each time they entertained, and the bathroom was rarely used. A decision to remove the bathroom was an easy one, and it opened up the possibility for much better flow and a much larger kitchen and breakfast area.
The couple agreed on most things. They both wanted very clean lines, an open feel and more contemporary styling. While they agreed on the functionality of the space and of the floor plan I created, when it came to the cabinetry color Lynn wanted a lighter finish and Mark wanted a richer, dark one. Rather than ask one person to compromise, I decided to come up with a design solution that satisfied them both.
With great trepidation, I threw out an idea. Fortunately, they liked the marriage of two interesting patterns of Italian imported laminates—one dark, one light—on a sleek cabinet door.
Reaching new heights
Mark is the main cook in the family, but at 6’2” he’s a bit tall for standard-height countertops. For this reason, it was essential to create a raised area to make food preparation more comfortable for him. Large, deep drawers adjacent to a pullout spice rack, crowned with a top of Calcutta Gold marble, fit the bill. A custom-designed stainless steel backsplash with stainless steel open shelves now provides easy-access storage and an open feel above the tall chef.
By removing the walk-in pantry, I was able to recess their existing full-depth refrigerator while also creating a cooking zone using their existing range. Frosted glass on aluminum-framed wall cabinets became a focal point surrounding a sleek, stainless steel chimney hood. Countertop space left and right became bonus prep room, which did not exist where the range previously was located. Deep cabinets on the opposite wall and a small broom closet to the left of the refrigerator returned storage borrowed from the pantry area.
Removing the bathroom also removed the bottleneck effect. The breakfast area now opens beautifully into the dining room. A banquette with drawer storage beneath seats four comfortably near the newly opened wall.
The design was completed with quartz countertops, soft gray walls and cement-looking large floor tile. Pendant lights over the sink and a lovely glass subway-tiled backsplash add both warmth and character.
It’s no fun asking anyone to compromise. But in this case, a unique combination of cabinetry and an astounding combination of husband and wife made happy marriages all around.
Gina Arledge is owner of The Kitchen Studio Inc. in Greensboro. To learn more, call (336) 855-0903 or visit www.thekitchenstudioinc.com.

Kitchen Radiance - Lighter Shades, Clean Lines
Summer 2010
Articles Archive
Kitchen Radiance - Lighter Shades, Clean Lines
06/21/10
Summer 2010
Kitchen Radiance - Lighter Shades, Clean Lines Open up Design Possibilities
Light, bright kitchens have resurfaced in a monumental way. Clean lines and sophisticated monochromes dominate page after page of home trend magazines and are making their way through cabinetry showrooms across the country.
Lighter kitchens give a feeling of spaciousness while maintaining the intimacy of this all-important room. With a return to classic styling and a mix of old and new, this trend is ageless — and one that’ll endure the tides of style changes.
Door styles are simplifying as well. Classic raised or recessed panel doors have re-emerged as a leader over the heavily moulded, profoundly distressed ones that gained in popularity before the turn of the century. This style is as archetypal to kitchen cabinetry as peanut butter is to jam. Painted finishes in varying shades of white dominate today’s selections and achieve a freshness that helps set the stage for the entire kitchen.
Lighter countertops in granite and marble also have become more popular. Granite offers design flexibility and is more forgiving of smudges and fingerprints than its darker counterparts. And while marble isn’t for everyone due to the softness of the stone and the potential for staining, this type of countertop is one of the most stunning and beautiful choices available.
Understanding the characteristics of your stone selection—and making sure that it suits your family’s lifestyle—is essential. Working with a stone specialist who can educate you on the fundamentals of a particular material is as important as having your countertops sealed with a stainproof, penetrating seal.
Tile backsplashes remain popular, but a shift in styling also has been simplified. Colorful accents and highly decorated tiles have been replaced by uncomplicated white, cream, and light gray designs. Various sizes and textures make it a sure winner when combined with lighter stones and cabinetry.
As an alternative to tile, matching granite or marble can be used as a full backsplash. Stone applied in a vertical manner is even more stunning than the counter itself and can become a remarkable focal point of the kitchen.
Simple, clean lines in cabinetry, countertops and backsplashes allow lighting possibilities to become the main attraction. Bell jar lights and lantern and maritime pendants offer solid lighting with a dose of nostalgia. Placement of these lighting fixtures varies with each kitchen, but they can suspend over islands, tables, peninsulas and windows.
This refreshing trend toward lighter, brighter kitchens is a step back in time. Marrying these elements presents a modern spin on traditional style. Good style always comes back around, and this one’s a keeper.

A Creative Haven
Spring 2010
Articles Archive
A Creative Haven
03/21/10
Spring 2010
A Creative Haven - Making Space For Artistic Passions
Every time I need to wrap a gift, it becomes a production. Remembering the last place I cleverly decided to stow the wrapping paper is challenging enough, but unearthing the last place my children used the scissors and tape? Forget it.
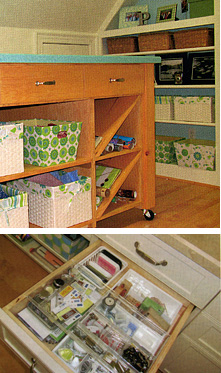
And while I enjoy scrapbooking and sewing, I often put off these activities simply because I don’t have a designated spot in which to accomplish them. It’s also due to the mess I’d no doubt leave. I can just see the heaps of clothes in need of repair and an overwhelming pile of pictures awaiting organization and precious placement. If only there were a corner of my home dedicated to one, two or even all three of these tasks.
Lately, requests for these types of spaces have been a top priority among clients: Nooks worked into laundry or bonus rooms and even attic space, designed to organize lives or close the door on the mess.
Custom creations
I recently was contacted by a former client who wanted the ultimate craft room. A player in the scrapbooking world, she had volumes of beautifully adorned photo albums with scrupulously organized pages of her children’s lives. She also had a table in her guest bedroom filled with monumental amounts of paper, special scissors, and piles and piles of photographs.
This client needed a room that was up to the task of helping her produce these works of art, as well as a spot for her other creative passions: sewing and gift wrapping. A small, unfinished room above her garage became my blank canvas for her craft room masterpiece.
Note upon note was taken of her special storage needs, from the specially sized file storage required for scrapbook pages to the amount of wrapping paper rolls. Everything was inventoried, and the designing began.
Three separate knee spaces were created, each with a separate function: one for sewing, another for scrapbooking and one with a computer desk; a television and upholstered chair also were added for some much-needed relaxation. Basket storage near the sewing area held fabric, while custom-designed lateral files stored scrapbook pages. Tall, shallow base cabinets near the desk contained office and computer supplies.
A U-shaped counter provided ample space to spread out, and bookshelves built into the wall stored photo albums, craft books, and cherished belongings. But the highlight was a large, multi-functional, mobile island. From one side, the top served as a place to lay out fabric patterns, while drawers below held measuring tape, pins, and shears. From the other side, the top provided the ideal gift-wrapping spot, with easy access to rolls of wrapping paper, ribbon, gift bags, scissors, and that elusive tape.
The end result was magnificent: a haven among havens for the mother of three boys. It’s become her escape to pale blue walls and flowery furniture, where her favorite hobbies surround her, all neatly organized and functional.
And of course there’s the door that can be closed.
Creative Cabinetry
Winter 2009
Articles Archive
Creative Cabinetry
12/21/09
Winter 2009
Creative Cabinetry - Achieving A New Look With Old Materials
Most kitchen remodels take place because cabinetry and appliances have exhausted their life spans and no longer suit the needs of the homeowner. Occasionally, though, relatively new cabinetry is removed because its style is dated or the desire for a different layout exists.
This decision to remodel leaves an opportunity for acceptable cabinetry, once removed, to be redesigned or repurposed into a different area. The benefits are twofold: It’s a cost-effective method of incorporating new work or storage areas into your home, and it’s an ideal way to keep landfills from piling up with construction materials.
In with the old
During a recent extensive remodel, a client had space for a large laundry room and a need for a second small kitchen area to be used by caterers while entertaining. Approximately 90 percent of the original kitchen cabinets were redesigned into a laundry/kitchenette room. Although the design held certain limitations, the end result was incredible and saved the client thousands of dollars.
Maintaining an updated kitchen showroom requires replacing cabinetry displays every three years. A few years ago, I was fortunate to redesign some cabinetry into a kitchen using the existing plumbing fixtures and appliances. While a few accent pieces had to be custom made, all but one cabinet was used to complete the project, and the finished kitchen looked and functioned beautifully.
Garages are another ideal place to reuse existing cabinetry. Things such as bulk items, tools, gardening equipment and pet supplies can be stowed neatly in cabinets, while the addition of an inexpensive laminate countertop can create an ideal workbench or potting area.
Often, clients living in older homes want to reuse a portion of existing cabinetry because it’s original to the home, such as a powder room vanity made from an interesting kitchen sink or built-ins made from old wall cabinets with glass doors. Holding onto an original piece of a home reflects the era in which it was built and adds an element of nostalgia to the completed remodel.
If you’re considering a full remodel, then consult with a kitchen designer about the possibility of re-using old cabinetry in another area. While doing so requires flexibility and the potential for some additional cabinets, this can be considered a financial savings toward a new kitchen while simultaneously helping the environment.
The Wonders of Green
Fall 2009
Articles Archive
The Wonders of Green
10/01/09
Fall 2009
The Wonders of Green - A Kitchen's Environmentally Friendly Options
When people ask about the hottest new color in kitchens, I always answer with a resounding “green.” And I don’t mean cabinetry, countertops or paint, but the country’s eager move toward incorporating sustainable, renewable, and energy-efficient products in the design of their new kitchens.
Some major steps that can be taken when implementing environmentally friendly design involve cabinetry, countertops, flooring and appliances. Here’s how to get started.
Eco-friendly options
Cabinetry has come a long way, and options for environmentally friendly products are on the rise. Low-formaldehyde and formaldehyde-free plywood construction are available in several cabinet lines. Selecting a renewable wood species such as lyptus or bamboo — or an eco-friendly, engineered wood — can help save the world’s diminishing forests and are beautiful alternatives to hardwood.
Countertops made from recycled glass, paper, aluminum and wood fibers can be durable as well as beautiful. Seek a product that will suit your family’s lifestyle, and request a sample piece so you can test each product’s resistance to scratches and stains.
Flooring has many of the same characteristics as cabinetry and countertops. Here, there are several offerings in engineered woods, as well as some biodegradable choices.
Energy Star appliances will be the most energy-efficient options. The energy savings can be anywhere from 10 percent to 50 percent, compared with unqualified models. Upfront costs might be higher, but the savings on utility bills will more than make up the difference.
When selecting these products, ensure that the manufacturers are not simply selling a green product, but that they’re also implementing production practices that reduce greenhouse gases. This can include using hydroelectricity to operate machinery, or utilizing a waste management system to recycle leftover materials.
Starting small
If an entire kitchen overhaul is not in your budget, then smaller changes can be made as well. For example, replacing faucets with low-flow models can lead to immediate water savings. Some models are fitted with sensors that automatically shut off running water. The use of aerators also decreases water flow while making it less noticeable for homeowners.
Switching to low-energy bulbs saves money as well, and it protects the environment from the damages of excess energy consumption. Simple measures such as using nontoxic cleaners and recycling rather than trashing also are small steps that can have a large environmental impact.
Thankfully, many of us have taken notice of the state of the world and are becoming proactive in the protection and restoration of our planet. I’m proud to be a part of an industry working so diligently toward the betterment of green building.

The Organized Kitchen
Summer 2009
Articles Archive
The Organized Kitchen
06/21/09
Summer 2009
The Organized Kitchen - Creating Order in a High-traffic Area
As the hustle and bustle of spring gives way to the dog days of summer, now is the perfect time to get your kitchen organized. It seems like a daunting task considering the increased activities of families this time of year, but having a plan in place to conquer your mess will reap great benefits for years to come.
The easiest way to get started is to inspect each cabinet. Have a box for items you’ll want to sell or donate, as well as a large trash bin for discards. Donate or consign any items you haven’t used in the past year. Duplicate items either should be donated or stored away and used when a child begins college or if you decide to purchase a second home. Dispose of or recycle broken items or mismatched plasticware. If an item holds sentimental value, then set it aside. Constantly ask yourself whether each item belongs in the kitchen, and consider alternative storage places for those that do not.
Think of your kitchen in terms of three zones: Cooking, cleaning and preparation. This will help you decide which items to place in each part of the kitchen.
Cooking
Store cookware, cooking utensils, hot pads, spices, and oils and vinegars near the range or cooktop. Cooking utensils should be stored in a drawer or nearby countertop container, while hot pads ideally are kept within an arm’s length of the oven, perhaps in a nearby drawer. Spices should be kept where they’re not only handy but also easily identified; a small lazy susan installed on the bottom shelf of a wall cabinet or an angled spice drawer insert can create easier access. A decorative tray that holds an attractive bottle of oil, pepper mill and some spice jars can be appealing if cabinet space is limited.
Pots are easily held in base cabinets, and deep drawers are an ideal way to do so. If you have a cabinet with adjustable shelves, purchase roll-out shelf inserts for easier access. Cookie sheets, muffin pans and pizza pans can be retrieved much more efficiently — and quietly — in a vertical position. Great locations include above the oven or microwave in a tall cabinet, in a deep cabinet over the refrigerator, or in a base cabinet near the cooking surface. Easy-to-install inserts also can be purchased for this application. Glass bakeware stores neatly on lower shelves of wall cabinets.
Cleaning
Fortunately, cleaning products don’t need to take up a lot of space; a cabinet under the sink should suffice. Keep dishwashing liquids and powders, spray cleaners, and trash bags here, along with a small basket that holds scrub brushes and sponges. A small drawer to hold dishcloths and towels should be located near the sink as well.
Preparation
Store items such as baking utensils, mixing bowls, small appliances, plasticware, and foils and baggies near the kitchen preparation area.
A top drawer below the prep counter is an ideal place for measuring cups and spoons, spatulas, and whisks. Wooden dividers and boxes, available in various sizes, can work wonders when it comes to organizing. Mixing bowls and plasticware should be in a deep drawer or cabinet below the prep area, while small appliances such as blenders, hand mixers, and food processors should be kept in a base cabinet or lazy susan nearby. Foils, plastic wraps and baggies should be stored in a drawer.
Dishes, glasses, and silverware typically are located based on their relationship to appliances and a breakfast table or island seating. Dishes and serving pieces should be kept in cabinets near the dishwasher to make unloading more convenient, while glassware can be stored near the dishwasher or refrigerator. Mugs are more convenient when stored near the coffeemaker, and plastic cups can be stored in an easily accessible deep drawer for children to access. Use cabinetry that is not easily accessed to store items that are not used often or those that have sentimental value.
Getting your kitchen organized can help make cooking, cleaning and entertaining much more enjoyable.
Remember to be flexible with these suggestions because every kitchen is different. Most important, cut yourself a break and allow yourself a junk drawer.
North Carolina Classic Design Elements
2008-2009
Articles Archive
North Carolina Classic Design Elements
01/01/09
2008-2009
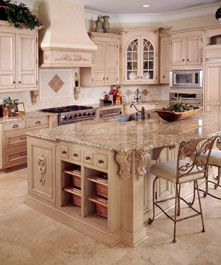
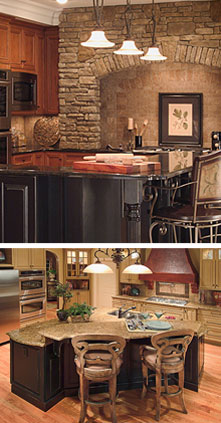
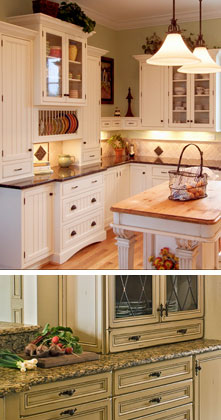
Cabinets & Countertops Showcase
A kitchen created by Gina Arledge and her design team needs no explanation. For the Kitchen Studio, it becomes more than a space where form meets function with exceptional cabinetry ~ it is an environment that comforts and invites both family and friends in an effortless manner
"We find that homeowners are often apprehensive when they first consider the design of their kitchen", explains Gina. "During the initial meeting, we demystify the process for them. Our clients quickly realize that they are surrounded by a staff of professionals who are not only creative and well organized but are also focused on minimizing the disruption to their lives. From door styles, wood species and accessories to price points, scheduling and installation, we take the time to discuss every detail involved".
With a winning combination of expert knowledge, creativity, and passion, the Greensboro firm translates the design ideas of their clients into critical details. "We know the end result will be a kitchen that is beautiful, well balanced, and is uniquely tailored to the client. For us, it doesn't end there. If we are good listeners, we are able in small or surprising ways to give them more than they expected and surpass what they had hoped for. The look on their faces once the project is complete confirms we have met this goal".
With imagination and fine cabinetry from Rutt HandCrafted Cabinetry, CWP and Cuisines Laurier Cabinetry, The Kitchen Studio delights in the opportunity to make small spaces work and large spaces feel more intimate.
North Carolina Classic Design Elements
2007-2008
Articles Archive
North Carolina Classic Design Elements
01/01/08
2007-2008
2007 Editor's Choice Awards
The 2007 Editor's Choice Awards are a visual display of distinctive detail, collectively representing the finest elements that exist within interior design. With classic and timeless artistry, these winning entries from across North Carolina reveal the creative talents and design integrity of the individuals responsible for them.
Selected by our judges, The 2007 Editor's Choice Awards present varying styles of interiors and demonstrate an outstanding ability to blend elegance with comfort and style in every area of the home.
North Carolina Classic Design Elements
2006-2007
Articles Archive
North Carolina Classic Design Elements
01/01/07
2006-2007
2006 Editor's Choice Awards
Through the artistic language of form and function, The 2006 Editor’s Choice Awards collectively presents the finest elements that exist within interior design. Displaying both classic and timeless artistry, these winning entries from across North Carolina also possess the creative ability to change how we see and how we see it.
Selected by our judges, the efforts of the 2006 Editor’s choice Awards reveal varying styles of interiors in which imaginative concepts are thoughtfully blended with an outstanding execution of detail.
North Carolina Classic Design Elements
2004-2005
Articles Archive
North Carolina Classic Design Elements
01/01/05
2004-2005
2004 Editor's Choice Awards
The 2004 Editor’s Choice Awards display varying styles of interiors, yet all come together as the perfect expression of the poetic grace that exists within design. From across North Carolina, these winning entries represent the talents of individuals who thoughtfully assume the powers of transformation in a classic and timeless manner.
Selected by our judges, the efforts of the 2006 Editor’s choice Awards reveal varying styles of interiors in which imaginative concepts are thoughtfully blended with an outstanding execution of detail.